Designing a geometric LED wall can transform a plain room into a measured, glowing composition. This guide explores how to customize a geometric led light wall pattern for bedrooms, studios, retail spaces, and hospitality interiors. The goal is not to fill every surface with light. Balance matters more.
I have tested layouts using triangular panels, hexagonal modules, and thin aluminum channels. My first design looked impressive on paper but felt crowded after installation. That mistake taught me to test the pattern at full scale first. Mark the wall with removable tape. Check viewing angles, furniture height, and nearby power access. A simple paper template can reveal awkward gaps before drilling begins.
Reliable customization starts with accurate measurements and compatible components. Confirm each panel’s voltage, connector type, brightness range, and heat clearance. Choose a color temperature that suits the room. Warm white can soften a lounge, while neutral white may support a workspace. Smart controls should be configured carefully, especially when several zones share one power supply. Follow manufacturer instructions and local electrical requirements. A qualified electrician should handle fixed wiring.
The following sections explain how to sketch a repeatable pattern, select materials, plan cable routes, and refine lighting effects. You will also see practical methods for adjusting symmetry without making the wall look mechanical. Some designs remain imperfect. That can be useful. A slightly irregular spacing may create character, but only when it appears intentional and remains structurally safe.
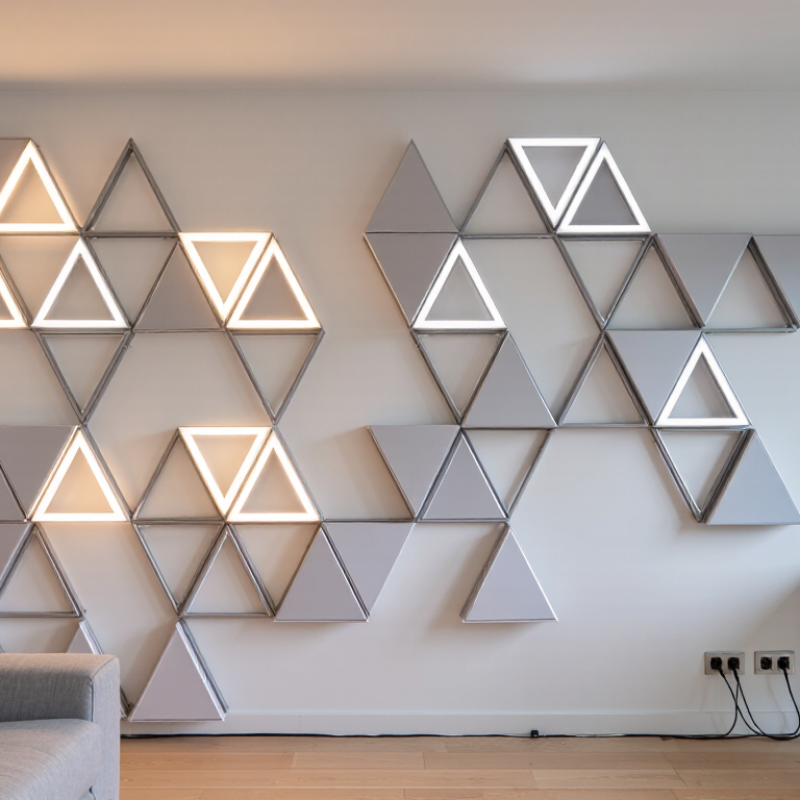
A geometric LED light wall begins with a clear visual system, not random shapes. Define the main components before choosing colors or effects. Common elements include triangular panels, linear bars, connectors, mounting rails, diffusers, power supplies, and control units. Each component needs a measured role.
I usually map the wall with a scaled drawing or simple digital grid. This reveals gaps, repeated angles, and difficult corners early. Select one dominant shape, then repeat it with controlled variations. Keep service access near power connections and avoid placing heavy components above weak surfaces. Allow space for ventilation, cable routing, and future repairs. A qualified electrical professional should verify the load, wiring, grounding, and local requirements.
The layout should guide the eye without becoming visually crowded. Symmetry feels calm, while offset patterns create movement. I often test the design using paper templates before installation. My first layouts were too dense, and the light looked flat from the side. That mistake taught me to check viewing angles, not only the front elevation. Use separate control zones when brightness or animation must differ across the wall. Shorter cable paths usually improve reliability. Still, every wall has different limits. Be ready to revise the pattern when the surface, heat, or access conditions disagree with the original plan.
| No. | Component | Recommended Specification | Typical Quantity | Placement | Layout Function | Customization Notes |
|---|---|---|---|---|---|---|
| 1 | Wall Backing Panel | 12–18 mm fire-rated plywood or aluminum composite panel | 1 continuous surface | Behind all elements | Provides a stable, level mounting surface | Use a dark matte finish to improve contrast and reduce visible reflections. |
| 2 | Geometric LED Modules | Triangle, hexagon, or square modules with 24 V LED strips | 24–60 units | Main pattern field | Creates the primary visual geometry | Combine two or three shapes while keeping a consistent module depth. |
| 3 | Light Diffusers | Opal acrylic or polycarbonate, 2–4 mm thick | 1 per LED module | Front face of modules | Softens hotspots and distributes light evenly | Choose translucent material for a balanced glow and lower glare. |
| 4 | Aluminum Frames | 20–30 mm deep powder-coated aluminum profiles | Perimeter of each shape | Around LED modules | Defines edges and protects internal wiring | Use matching frame depths to maintain a clean geometric rhythm. |
| 5 | Pattern Grid | Modular grid with 250–400 mm center-to-center spacing | 1 layout plan | Entire wall | Controls alignment, spacing, and visual balance | Start with a grid before adding intentional offsets or rotations. |
| 6 | Accent Shapes | 10–20% of total modules in a contrasting shape or color | 5–12 units | Focal points | Directs attention and prevents a repetitive pattern | Place accents near viewing zones, entrances, or the center of the composition. |
| 7 | LED Power Supplies | 24 V constant-voltage units with 20% spare capacity | 1 per 100–150 W load | Ventilated service area | Provides stable and serviceable power | Separate power zones to simplify maintenance and reduce voltage drop. |
| 8 | Control System | Dimmable controller with static, fading, and color-temperature modes | 1 system | Accessible control panel | Manages brightness and programmed scenes | Include a low-brightness scene for prolonged viewing and photography. |
| 9 | Cable Management | Low-voltage cables in concealed channels or flexible conduit | 1 route per power zone | Behind the wall panel | Keeps the pattern visually clean and safe | Label both ends of every cable and leave service loops near each module. |
| 10 | Mounting Hardware | Wall anchors, screws, brackets, and spacers rated for the wall substrate | As required | Panel and module joints | Secures the installation and creates consistent depth | Confirm the substrate load capacity before selecting anchors and brackets. |
| 11 | Recommended Wall Size | Approximately 3,000 × 2,000 mm for a medium installation | 1 installation zone | Feature wall | Provides enough area for hierarchy and negative space | Keep approximately 15–25% open space so the pattern does not appear overcrowded. |
| 12 | Lighting Performance | Typical brightness of 300–800 lumens per square meter with dimming | Project dependent | All illuminated areas | Balances visibility, comfort, and energy use | Use a light meter during commissioning to confirm uniformity and avoid glare. |
Choose a pattern that suits the room, not only the camera. Hexagons feel rhythmic, while triangles appear sharper. Mark the wall with removable tape first.
Keep the central shape near eye level. Check outlets, corners, shelves, and picture frames before mounting. A small asymmetry can add character, but excessive randomness looks unfinished.
Warm white softens wood, concrete, and reading areas. Cool white can make studios and workspaces feel clearer. One dominant color with a restrained accent usually feels calmer.
Daylight can hide uneven brightness. Test the wall in darkness and adjust intensity carefully. Stable color changes are better than sudden jumps.
Plan the power path before fixing the modules. Keep cables accessible and use compatible low-voltage components. Mains connections should be checked by a qualified electrician.
Sketch every module and connector position first. Assemble the sections on a clean floor. Check brightness, color temperature, connectors, and power limits before final mounting.
Keep spacing consistent across the pattern. Even a five-millimeter error can become obvious on a large wall. Leave a small service gap for repairs and cable access.
A loose connector is often the cause. Check each section before replacing a panel. My first layout was too tight, and maintenance became awkward. More empty space would have helped.
This guide explains how to customize a geometric led light wall pattern from concept to completion. It begins by defining the wall’s components, such as LED modules, connecting lines, control elements, and support structures, then organizing them into a balanced geometric layout. You will also learn how to select a suitable pattern, coordinate colors, and decide whether the lighting should remain static, shift gradually, or respond to programmed effects.
The process continues with accurate wall measurements and a practical plan for arranging the LED modules evenly and safely. After preparing the surface and components, the pattern can be assembled and installed according to the design. Finally, the display should be programmed, tested, and refined to improve brightness, spacing, color transitions, and visual balance. With careful planning and creative adjustments, a customized geometric LED wall can become an attractive and flexible feature for many interior spaces.

 Xolle Light